Yerga qoʻyish uchun 11 ta oddiy qadam
 Qanday qilib oʻrnatish kerak Yerga qo'yilgan hassalar 11 ta oddiy qadam
Elektr tizimingiz xavfsiz va ishonchli boʻlishi uchun, yerning toʻqimalarini toʻgʻri oʻrnatish juda muhimdir. Misli maydalash uchun asbobni tanlang, galvanlashtirilgan tuproq po'sti , yoki temir bilan qoplangan mis kafile , to'g'ri o'rnatish tartibini qo'llash elektr xavf-xatarlarini oldini olishga va tizimning optimal ishlashini ta'minlashga yordam beradi. Ushbu qoʻllanmada yerlash uskunalarini muvaffaqiyatli oʻrnatish uchun 11 ta oddiy qadam keltirilgan.
1. O'z navbatida Toʻgʻri tuproqni bosish uchun qoʻllanma tanlang
Yerga qo'yish uchun birinchi qadam - ehtiyojlaringizga mos keladigan turini tanlashdir. Misli tuproqli to'qimalar nam muhitda ajoyib o'tkazuvchanlikni taklif qiladi, galvanlashtirilgan tuproqli to'qimalar esa korroziyaga chidamliligi tufayli quruq sharoitlarda ko'proq mos keladi. Agar siz ham chidamli, ham o'tkazuvchanlikni qidirsangiz, mis bilan qoplangan tuproq po'sti yoki кумуш ярим чизма ideal bo'lishi mumkin. Toʻgʻri tuproq toʻplarini tanlash haqida koʻproq maʼlumot olish uchun, tashrif kunbpower.com .
2. Oʻzingizga ishonch hosil qiling. Kerakli vositalar va materiallarni toʻplang
Ishga kirishdan oldin quyidagi vositalar va materiallarni yig'ing:
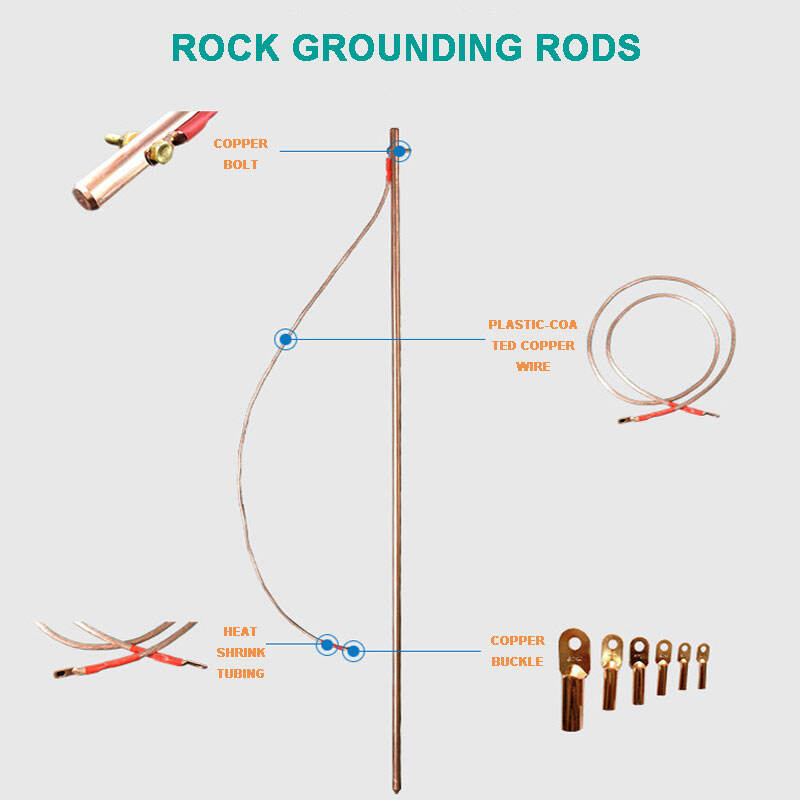
- Yerlash dastasi (masalan, 8 futli misli yerlash dastasi, 5/8-li yerlash dastasi yoki yerlash uchun misli dastasi)
- Yerlash simlari (turligingizga qarab mis yoki konservalar orasidan tanlang)
- Simni yerga qo'yish uchun bosish
- Qo'lqopni o'rnatish uchun bolg'a yoki yerga qo'yish uchun qo'lqop haydovchisi
3. Oʻzingizga ishonch hosil qiling. Mahalliy qoidalarni tekshiring
Yer quvurini o'rnatishdan oldin mahalliy elektr kodlarini tekshirish juda muhimdir. Qoidalarda talab qilinadigan tayoq turi, o'rnatish chuqurligi va material ko'rsatilishi mumkin. Tekshiruv paytida muammolardan qochish uchun ushbu qoidalarga rioya qilishingizga ishonch hosil qiling. Masalan, mahalliy standartlarga qarab galvanlashtirilgan yoki zanglamaydigan po'latdan ishlov berish uchun po'latdan foydalanishingiz mumkin.
4. Oʻzingizga ishonch hosil qiling. Oʻrnatish joyini tanlang
Yerni qo'yish uchun eng yaxshi joy odatda elektr paneli yaqinida bo'ladi, ammo u yerda katta toshlar, daraxt ildizlari yoki boshqa to'siq bo'lmasligi kerak. Yerga qo'yish asbobini yer bilan yaxshi bog'lanadigan tuproqqa o'rnatganingizga ishonch hosil qiling. Agar siz misli yerga qo'yish hassasi ishlatayotgan bo'lsangiz, u kamida 8 fut uzun bo'lishi kerak, ammo bu sizning mahalliy talablaringizga qarab farq qilishi mumkin.
5. Oʻzingizga Yerni tayyorlang
O'rnatish uchun joy tanlaganingizdan so'ng, qurilishni to'xtatishi mumkin bo'lgan har qanday xaroba yoki katta toshlarni olib tashlash orqali erni tayyorlang. Agar siz dastgohni qo'lda o'rnatmoqchi bo'lsangiz, kichik bir teshik qazishingiz kerak bo'lishi mumkin. Agar siz yerni bosish uskunasidan foydalansangiz, bu qadam tezroq va samarali bo'ladi.
6. Oʻzingizga Yerni bosish asbobini oʻrnatish
Yerni qo'yish vaqti keldi. Agar sizda qo'llanma bo'lsa, uni o'zingizning qo'lingiz bilan qo'lingiz bilan bosing. Agar siz 8 futli misli tuproq ustunidan foydalansangiz, u to'liq yerga joylashtirilganligiga ishonch hosil qiling. Mis bilan qoplangan po'latdan yasalgan tuproq barglari ayniqsa chidamli va nam yoki haroratli muhitda yaxshi ishlaydi, bu esa ularni uzoq muddatli o'rnatish uchun ajoyib tanlov qiladi.
7. Biror narsa Yerga qoʻyish simini ulash
Yerlash ushlagi joyida bo'lganidan so'ng, u yerlash simini ulash vaqti keldi. Simni tuproqga yopishtiruvchi klamp yordamida tayoqqa bog'lang. Elektr toklari oqib ketmasligi uchun ulanish mustahkamligiga ishonch hosil qiling. Qo'pol ulanish xavfsizlikka olib kelishi mumkin, shuning uchun simning misli yerga qo'yish to'g'riga mustahkam bog'lanishi muhimdir.
8. Biror narsa Yerga solish simini elektr paneliga ulash
Yerga qo'yish simining boshqa uchini olib, uni elektr panelingizdagi yerga qo'yish terminalini bog'lang. Bu bosqich elektr zaryadlari yoki elektr toʻlqinlari yerga toza mis ustun orqali oqishiga imkon beradi. Simning mustahkam bog'langanligi va shikastlanmaganligiga ishonch hosil qiling.
9. Biror narsa Yerga qoʻyish tizimini sinash
Hamma narsa o'rnatilgandan so'ng, yerning qarshiligini sinovchi vositadan foydalanib, yerning qarshiligi va yer o'rtasidagi qarshilikni tekshiring. Yaxshi yerga qo'yish tizimi past kuchlanishga ega bo'lib, elektr energiyasi yerga erkin o'tishiga imkon beradi. Agar qarshilik yuqori boʻlsa, siz asbobni chuqurligini oʻzgartirishingiz yoki qoʻshimcha asboblarni oʻrnatishingiz kerak boʻladi.
oʻn kishi. Barcha aloqalarni xavfsizlang
Barcha ulanishlar xavfsizligini tekshirish uchun ularni ikki marta tekshiring. Agar siz misli yerga qo'yish uchun qo'llagan bo'lsangiz, u qattiq va zanglanmasligini tekshiring. Nam muhitda qo'shimcha himoya uchun namlik va zanglanishga qarshi yuqori chidamlilikni ta'minlaydigan galvanizlangan yoki zanglamaydigan po'latdan yasalgan tuproqdan yasalgan tuproqdan foydalanish haqida o'ylab ko'ring.
11 ta. Oxirgi tekshiruvni oʻtkazing
Barcha ulanishlarni ta'minlab, sozlashni tugatgandan so'ng tizimingizni yakuniy tekshirib ko'ring. Hech qanday bo'sh aloqalar yo'qligiga va hamma narsa to'g'ri o'rnatilganligiga ishonch hosil qiling. Agar siz namlik darajasi yuqori bo'lgan hududda yashasangiz, tizimning ishlashini oshirish uchun galvanlashtirilgan yoki zanglamaydigan po'latdan qurilgan ko'proq quritish asboblarini qo'shishni o'ylab ko'rishingiz mumkin. Yuqori sifatli yerlash yechimlari boʻyicha qoʻshimcha maʼlumot olish uchun www.kunbpower.com
Xulosa
Elektr tizimining xavfsizligini ta'minlash uchun yerni qo'yish muhim vazifadir. Misli, galvanlashtirilgan yoki misli po'latdan yasalgan po'latli po'latni tanlasangiz ham, ushbu oddiy qadamlarni qo'llash sizga xavfsiz va ishonchli po'lat tizimini yaratishga yordam beradi. Yerlash uskunalari, yerlash tizimlari va shu bilan bog'liq mahsulotlar haqida ko'proq ma'lumot olish uchun tashrif buyuring www.kunbpower.com

